Welcome back!!! Today we are going to explore the contents of pattern envelops and see if we start making heads or tails out of this stuff.
I have chosen two patterns that we are going to break down and then hopefully in later installments, sew a scrub top or two! I do need to forewarn you, I have been collecting patterns for a while as well as my fabric hoard, so many of the ones I will be using are "out of print". The only thing that is important about out of print patterns is you cannot purchase them at your local fabric store. If you want to purchase a pattern and follow along, please feel free to do so, I am also precariously close to breaking copyright laws but photographing the contents of the envelops. So, with all that knowledge, let's procced:
We will begin with Simplicity pattern #8336, it is a VERY simple scrub top with 5-6 pieces, remember the fewer the pieces the easier it is.
and we will be using the happy St Paddy's day design:
I had purchased 3 yards of this fabric because I know that large scrub
tops need about 2 1/2 to 2 3/4 yards. Since I like lining things up, I
always over buy so I have three yards to work with, but for this
demonstration, I am not going to get overly concerned with seams and all
that stuff, OK? So let's look at the back and see what we actually need for this:
So for a Large view "B" out of 45" cotton print we will need 2 yards of fabric, 3/8 yards of interfacing either fusible or non-fusible (remember fusible means iron on) and in the notions section looks like view "B" just needs thread. So supplies are purchased, or in my case, laying around ready to be sewn together, lets take a look at the inside of the envelop!
There will be instructions/directions on paper similar to newspaper and the actual pieces of the pattern are printed on these tissue paper type sheets that are quite large and sometimes difficult to manipulate. The sheets in this pattern are about 5 feet long by 5 feet wide and very difficult to photograph!
What comes next?? We need to find the correct pieces we need to make top B! How do we do that? First page of the instructions:
Well that doesn't seem so bad, does it? We need to locate and cut out piece numbers; 2, 3, 5, 7, 8 and 9. Since this pattern only contains size large and extra large, then won't be a lot of lines on the pieces we use. Just accept that for now, we will run into a multi-size pattern soon enough!! I had to gently unfold all three sheets to find the correct pieces, but once located and cut out, I am able to refold the remain sheets to fit back into the envelop for later, kind of map folding; takes a little practice, but with a little patience, completely doable!
Now we have our pieces ready to go onto the fabric. Let's take a moment to really go through the pattern directions, so we can better understand some of the terms used later on.
First page:
Will give you sketches of the items included in the pattern envelop, the corresponding piece numbers, and if you look up near the Simplicity logo you will see 1 / 4 which means this pattern has 4 sheets of directions.
Just beneath the sketches starts the "General Directions" section. This is an important area, so don't skip it! This pattern is printed in both English and Spanish, I only took photos of the English portions, as I don't speak Spanish, so I can only guess what that side is saying. I know the above is a little blurry, but worry not! I took more photos... Starting at the top left, "the Pattern"
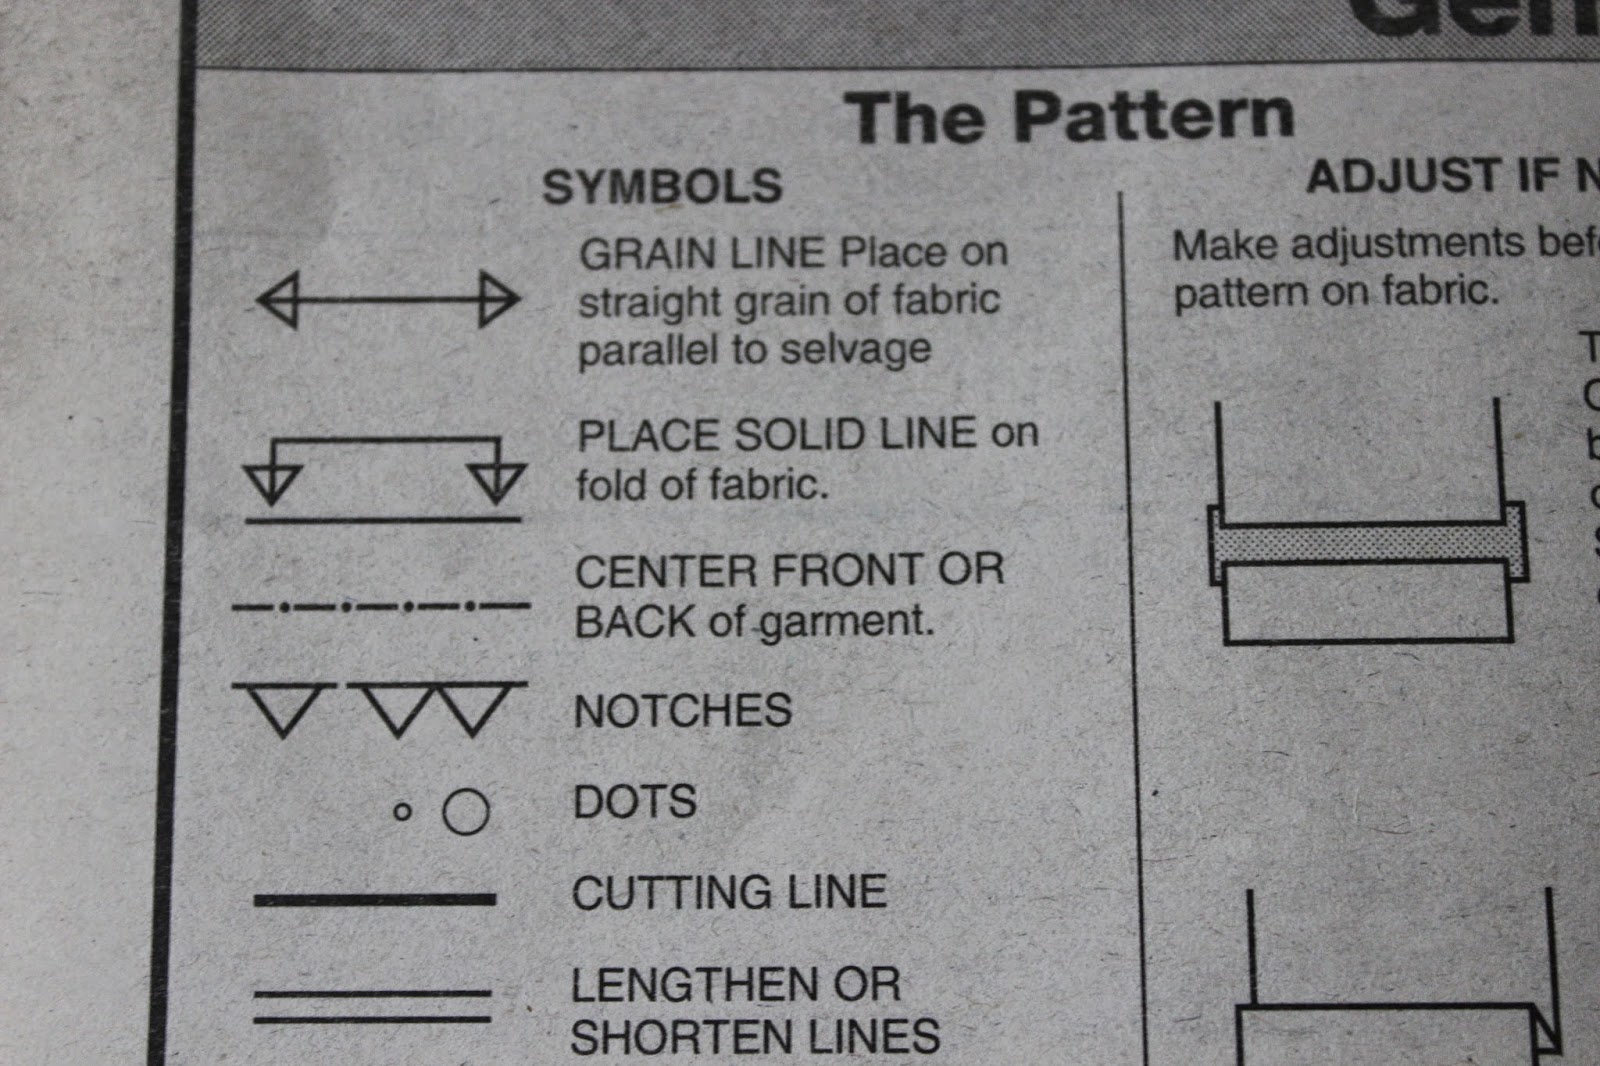
The Symbols that are printed on the tissue paper pattern are explained in this section. These are VERY important!! When you cut the pattern be mindful of the little arrows on the solid lines, remember the "color in the lines" lessons? Well, similarly cut on the bold solid line. Let's go in order:
- The line with the arrows at both ends means "grain line" this is exceedingly important when working with nap fabrics, directional prints, knits and all fabrics to a lesser extent.
- The arrows pointing towards a solid thick line means you are going to place that piece of the pattern on the folded fabric.
- Dashes and dots means this is the part of the fabric that will be centered on the wearer's front or back, respectively. Imagine an invisible line running from the nose down, this is where the dashed line will be on the garment we are creating. Hope that makes sense. The back is easier to imagine, the dashed line should be on the spine.
- Notches I really really really really wish that these were printed on the OUTSIDE of the solid line.... The notches are stupid important because this is how one will line up things like sleeves, the front of something to the back of something, and if you cut them into the lines, while it make work, you may also have just made something a wee bit to small. I cut mine outward, so I ask you do the same, k? K!
- Dots are also a means of lining up things while we construct the garment They are handy to ensure you have the pieces aligned so you don't end up with a stitch ripper redoing all your hard work.
- Cutting line seems obvious enough, you cut on this line.
- lengthen or shorten lines, if one is of a taller stature or petite, these lines will be your friends. See below for more on adjusting length.
Expanding on #7 above, the other box are the directions to make the garment a little longer or shorted, for those taller or more petite than average:
Which is very self-explanatory so we will move on...
Sewing directions:
This is where it may get a little more confusing,

- Pin, is obvious, but "machine baste" means that using the longest stitch your machine has to "tack" the pieces together until a more permanent seam can be placed.
- Stitch 5/8 seams unless otherwise stated. So this might be a good time to bring up a term called "seam allowance". When sewing 2 pieces of fabric together, how far from the stitch line to the edge of the raw fabric is the seam allowance. This particular top has a 5/8 seam allowance.
- Press seams open unless otherwise indicated.... Once the stitch is placed, take your iron and flatten the edges
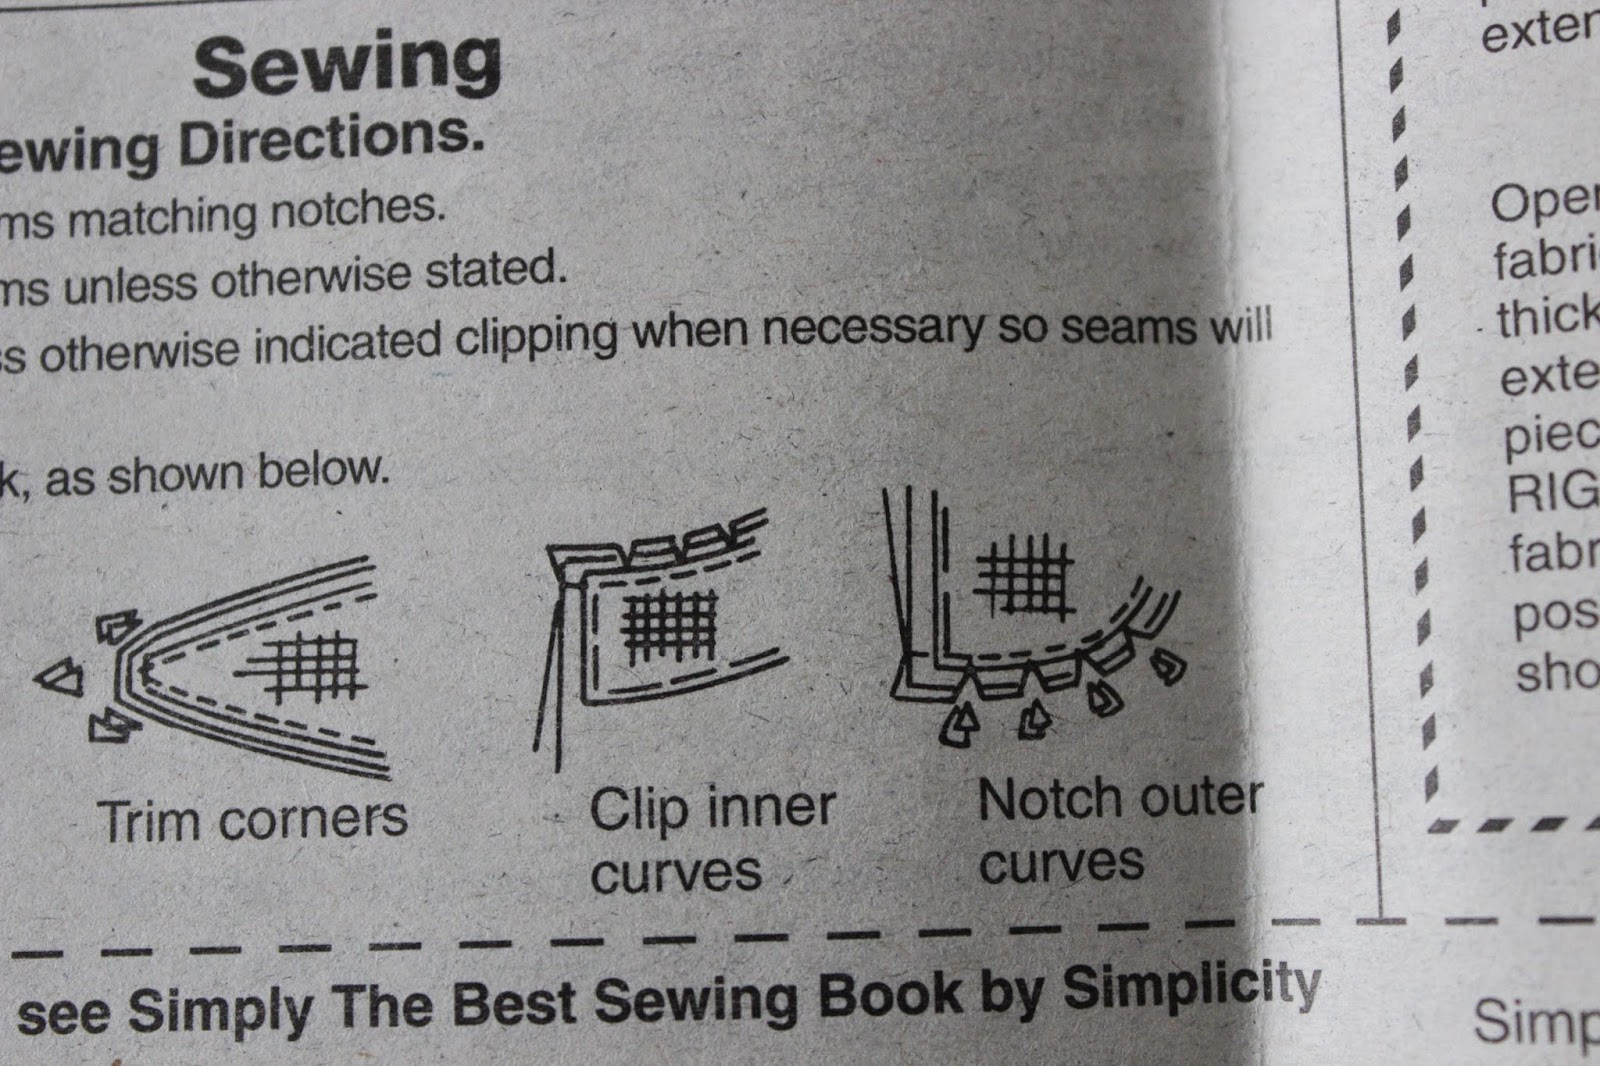
- Trim seams to reduce bulk as shown below; we will go through the pictures individually. When creating an item, sometimes the seams will get bulky and cause puckering in the corners and other things that won't allow the garment to be finished nicely.
- Trim enclosed seams into layers, this one is a tricky one to master. It is a folding technique as well.
- Trim corners. This is especially important when making a collared shirt, let's say. The collar should come to a tight point, but if there are too many layers on the inside, it will be bulky and buldgey (is that a word) and no amount of ironing will make it lay flat.
- Clip inner curves. This is also important for the finish of the garment, if a garment has "princess seams" or something similar in detail, clipping curves will help the seam lay flat and the seam look straight and finished.
- Notch outer curves (below). Similar to the inner curves, the outer curves if not clipped will not allow the fabric to curve correctly. For example, a fleece hat will need to curve at the crown (top of head) and in order to do that, you have to clip the outer curve.
Alrighty, so, onto page 2. These are the "cutting layouts" which simply means where to put the pieces on the fabric so you will get the best results. You don't HAVE to follow the suggested layout, but sometimes it is nice to have a suggestion. Personally I am notorious for not following a layout, I like to call it "creative pattern laying", but until you are comfortable with the whole process, let's just stick with the manufacturer directions.
Ok so you may notice that the large arrows are marked in the cutting layouts, remember the first page, the large arrows mean "with the grain" of the fabric. Or if it helps, keep all the arrows going the same way. you will also see some shaded pieces on the layouts, this is to indicate to turn the pattern piece over in order to achieve the correct placement.
There are also the words "fold" and "selvage". The selvage edge are the manufacturer edges on the width of the fabric and the fold is of course the fold in the middle. The selvage edge is finished by the manufacturer and will not fray or pull apart. Below are photos of the selvage edges of the St Paddy's Day pattern that we will using for this example:
With this particular manufacturer, they have the print all the way to one edge and their information on the other. This fabric is not intended for "children's sleepwear" probably due to a flammability rating and I want to point out those little circles with numbers in them. These little indicators are AWESOME for quilters because you can trim off those little circles and take them with you to the fabric store, and simply match them with other prints so the colors will go.
So I think this post is certainly long enough, while there is plenty more to talk about, let's just take a moment or two to review the information in this post before I throw WAY too much at you at once!! Please ask any questions you may have, and I'll see you next time!


