Wednesday, July 22, 2015
Deepest apologies
I will be back shortly. Had a couple of health issues and will be able to return shortly. Stay tuned
Wednesday, August 6, 2014
Neckline
This entire post will detail the neckline of this particular scrub top. I can't say I am a tremendous fan of this style of neckline, but let's follow all directions as written. If this wasn't going to be an instructional type blog, I may have switched out this neck for something a little less fussy and heavy.
We will start with the directions starting at #2.

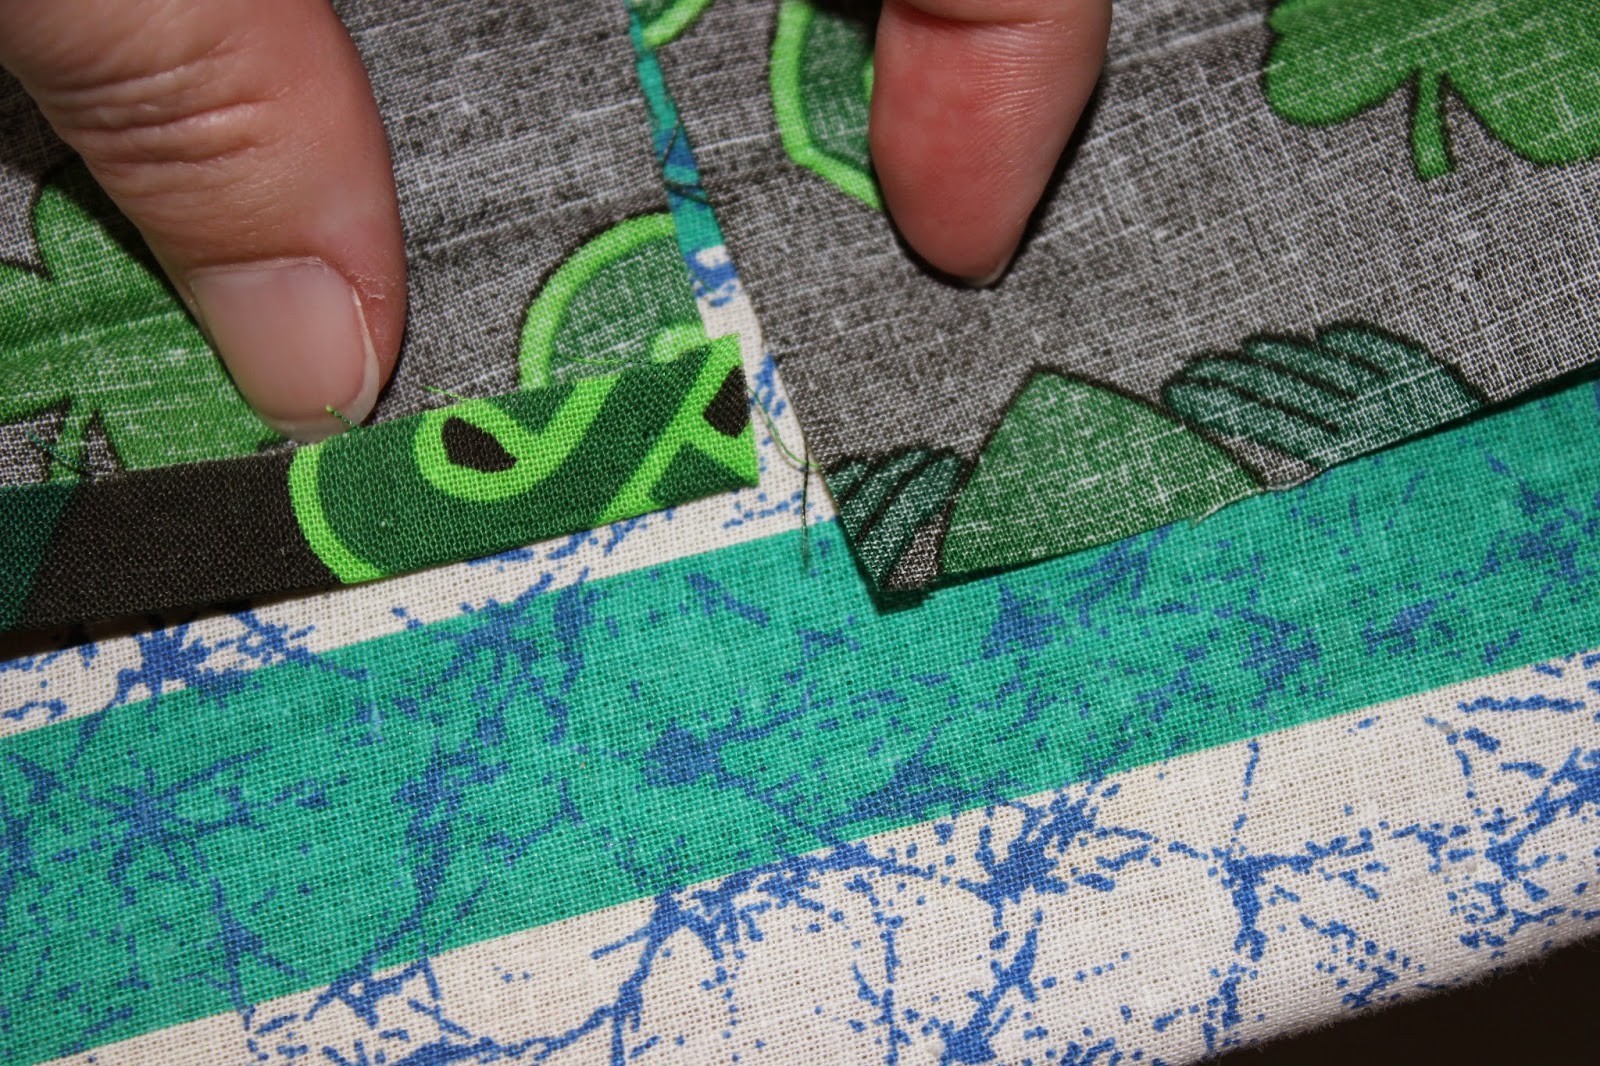
 OK, so look at the little drawing of #2 and you will see what they want you to do, literally take a pair of scissors and cut a piece of fabric out of the middle of the neckline:
 I left a little section unstitched so hopefully you could see it a little better. Again the black thread can be difficult to see.
Then fold and press the edges on that stitchline:
 See the little bit you cut out allows the fabric to fold without getting all bunchy in the center.
The next part of the instructions deals with interfacing. I use fusible which means I iron it on and it bond to the fabric. Always follow manufacturer instructions. The fusible uses either hot dry iron or hot steam iron, make sure you read the directions because steam will ruin the dry kind and you won't get a great bond if you use dry heat on the steam fusible.
So this particular company called pellon makes a lot of interfacing both fusible and sew-in, this happens to be steam activated fusible.


 Once you are pleased with the result, then move onto fusing the interfacing onto the pieces according to the directions. We are on step #4.


Once the pieces have cooled and you won't burn your fingers, fold the pieces in half with the fused side together and press them with the iron; then, using your machine longest stitch, tack the unfolded edges together.
Check the directions, make sure we have completed step four and then move onto step #5.
We need to make the "band" into a "V" shape and then stitch that together so it remains a "V" shape:

 Once you are finished stitching that, it is time to attach the neck to the shirt. Remember, we had folded the notches on the shirt to the "wrong" side, so when we are lining up the neck band to the shirt, we may not be able to see the notches on the shirt. We are now on step #6.


Once you have to pinned into place, stitch using a medium length stitch with your machine close to the folded down part on the shirt. Then stitch again about 1/4 inch from that first stitch line


Let's stop here for now, I was hoping to get the entire neckline done but we are again out of time. We will begin the next post on step #7 making the back facing.
We will start with the directions starting at #2.
Then fold and press the edges on that stitchline:
The next part of the instructions deals with interfacing. I use fusible which means I iron it on and it bond to the fabric. Always follow manufacturer instructions. The fusible uses either hot dry iron or hot steam iron, make sure you read the directions because steam will ruin the dry kind and you won't get a great bond if you use dry heat on the steam fusible.
So this particular company called pellon makes a lot of interfacing both fusible and sew-in, this happens to be steam activated fusible.
Ok, so the best thing to do according the directions is take a small scrap and "practice" fusing the interfacing to the fabric. What that basically means is you want to make sure there is a good bond between the two. The directions will give you an idea of how long to hold the iron onto the interfacing but some fabric bonds quicker than others, so use a scrap and try it out prior to ruining your project.
Once the pieces have cooled and you won't burn your fingers, fold the pieces in half with the fused side together and press them with the iron; then, using your machine longest stitch, tack the unfolded edges together.
Check the directions, make sure we have completed step four and then move onto step #5.
We need to make the "band" into a "V" shape and then stitch that together so it remains a "V" shape:
Once you have to pinned into place, stitch using a medium length stitch with your machine close to the folded down part on the shirt. Then stitch again about 1/4 inch from that first stitch line
Let's stop here for now, I was hoping to get the entire neckline done but we are again out of time. We will begin the next post on step #7 making the back facing.
Wednesday, July 2, 2014
Thank you for your patience!!!
Welcome back, happy sewers!!!!
First, the health thing, I noticed this annoying little lump at the bottom of my right foot; tons of testing and doctors later, turns out I have "Plantar Fibromatosis". Which are just painful little tumors but are never cancer. When it hurts enough, they will operate and remove them. Until then, I'm not keen on anyone cutting up the bottom of my feet.... So onto our sewing project:
Now before we were rudely interrupted, we were making a happy little scrub top. We had left off after getting all the pieces of the pattern cut so you should have something that looks like this:
 Ok so now that we've found our pieces, let's start making sense of the pattern and how these things fit together like a puzzle.
To start on top "B", the directions say to make the pockets like we would if we were making top "A"


 According to the directions, start with step 2 under view "A" for the correct pockets. which initially sounds like gibberish... So let's break this down, first we have a "fold line" on the pattern:

Sorry if the striped ironing board is distracting.... never really paid attention to it until now!! Ok, so the directions say something about folding 1/4 of a inch something fold line something something.... That is exactly what it says!!!
Now I have a handy little tool, it is a 6 inch measuring thing with a blue slide on it which makes it super easy to find 1/4 or 1/2 or whatever the pattern calls for.


What the directions want you to do, and it actually says it in a round about way is fold 1/4 inch of the raw edge from the top of the pocket that will eventually tuck up under the fold line that is on the pattern to make the finished edge of the pocket. Now that sounds simple enough! So here are some photos going through those steps:


 And your finished pocket should resemble this:
 We will now need to sew it together so the pocket remains that shape. In other words, when one throws keys in that pocket, one wants the pocket to remain intact and not fall apart. So, let's whip out our sewing machines!
We all know how to thread a machine and everything and we are ready to sew, right? If not, please comment and I will address the threading of the machine. It is usually pretty simple and the manufacturer will have a schematic printed on the machine itself, but give me a holler if you need help.
I chose black thread for this project because I have a ton of it and I thought it would be less noticeable once the garment is finished. However it isn't the easiest to see in some of the pictures so I apologize for that. I should have used yellow thread!!!
So we want to stitch the perimeter of the pocket on the machine taking care to "picture frame" it or not run off the edges (makes a stronger seam) so here is a tip when turning corners,


Leave the needle in the fabric when you lift up on the presser foot. This will cause a pivot type action and your stitch will pick up just around the corner. Many of the newer machines will have a button to lower the needle and if you have an older machine. simply turn the wheel thing until the needle is in the fabric!
Questions so far? Please comment if you do, I'll get back to you!
So repeat procedure for two remaining pockets until you have three (2 larger, one smaller) complete pockets and they are ready to be placed on the front of the scrub top! Remember once the pockets are sewn, turn back to view "B" so we don't make a boo-boo and sew too much into the "A" directions, only to realize we need to rip out a bunch of stitching, which is not THAT big of a deal, but a time waster. So pockets are finished, let's flip back to view "B" and see what to do with these pockets.

Another tool I use is a chalk pencil, the markings aren't that bright or noticeable, so feel free to use whatever means to transfer all those dots and circles from the pattern to the wrong side of the fabric so you can line up things.
 Once you go to the fabric store, look in their "Notions" section, there will be an array of things to mark fabric with. I use the pencil because it washes out easily and it is easy to use. The chalk paper with the wheel I also use but for larger markings.
So line up the pockets with the dots that you marked on the fabric and it should look something like this:
 I've told you about my love for lining stuff up?? And I said I wasn't gonna do it for this project?? Well, I lied, I can't help it!!!! This little knot almost lines up perfectly with its surrounding so why not? If yours doesn't, NOT the end of the world, my bottom pockets aren't even close!


Ok, pockets pinned in place, happy with placement? Good, let's stitch them onto the top, the directions say to stitch as close as you can to the stitching that is already there from when we first made the pockets. This is really difficult to see with the black thread, so try your best to either have an even space all the way around or stitch over the top of the other line.
Now the other thing the pattern doesn't tell you: but I do this, because I wear these tops and use/abuse the pockets; once you get to the top of the pocket where it attaches to the top, stitch back and forth there a few times so the threads don't loosen over time. Easiest way to do this is using the backwards or reverse button on your machine. If feeling adventurous, you can "Bar tack" them on which means using a very dense zig-zag stitch that basically stays in the same spot. If you look at most jeans, the areas with the thick thread near the zipper is bar-tacked.

Well, my dear readers, I really think that is enough for one day. You should have at this point, pockets attached to the front of your top. Next time we will make the neck and back facing, stitch the front to the back and finish off the sleeves and bottom hem. After that, we will have a top!!!
First, the health thing, I noticed this annoying little lump at the bottom of my right foot; tons of testing and doctors later, turns out I have "Plantar Fibromatosis". Which are just painful little tumors but are never cancer. When it hurts enough, they will operate and remove them. Until then, I'm not keen on anyone cutting up the bottom of my feet.... So onto our sewing project:
Now before we were rudely interrupted, we were making a happy little scrub top. We had left off after getting all the pieces of the pattern cut so you should have something that looks like this:
To start on top "B", the directions say to make the pockets like we would if we were making top "A"
Sorry if the striped ironing board is distracting.... never really paid attention to it until now!! Ok, so the directions say something about folding 1/4 of a inch something fold line something something.... That is exactly what it says!!!
Now I have a handy little tool, it is a 6 inch measuring thing with a blue slide on it which makes it super easy to find 1/4 or 1/2 or whatever the pattern calls for.
What the directions want you to do, and it actually says it in a round about way is fold 1/4 inch of the raw edge from the top of the pocket that will eventually tuck up under the fold line that is on the pattern to make the finished edge of the pocket. Now that sounds simple enough! So here are some photos going through those steps:
Once you have the fold tucked under, then proceed to the next step which is basically repeat the 1/4 inch fold around the perimeter of the pocket:
We all know how to thread a machine and everything and we are ready to sew, right? If not, please comment and I will address the threading of the machine. It is usually pretty simple and the manufacturer will have a schematic printed on the machine itself, but give me a holler if you need help.
I chose black thread for this project because I have a ton of it and I thought it would be less noticeable once the garment is finished. However it isn't the easiest to see in some of the pictures so I apologize for that. I should have used yellow thread!!!
So we want to stitch the perimeter of the pocket on the machine taking care to "picture frame" it or not run off the edges (makes a stronger seam) so here is a tip when turning corners,
Leave the needle in the fabric when you lift up on the presser foot. This will cause a pivot type action and your stitch will pick up just around the corner. Many of the newer machines will have a button to lower the needle and if you have an older machine. simply turn the wheel thing until the needle is in the fabric!
Questions so far? Please comment if you do, I'll get back to you!
So repeat procedure for two remaining pockets until you have three (2 larger, one smaller) complete pockets and they are ready to be placed on the front of the scrub top! Remember once the pockets are sewn, turn back to view "B" so we don't make a boo-boo and sew too much into the "A" directions, only to realize we need to rip out a bunch of stitching, which is not THAT big of a deal, but a time waster. So pockets are finished, let's flip back to view "B" and see what to do with these pockets.
Another tool I use is a chalk pencil, the markings aren't that bright or noticeable, so feel free to use whatever means to transfer all those dots and circles from the pattern to the wrong side of the fabric so you can line up things.
So line up the pockets with the dots that you marked on the fabric and it should look something like this:
Ok, pockets pinned in place, happy with placement? Good, let's stitch them onto the top, the directions say to stitch as close as you can to the stitching that is already there from when we first made the pockets. This is really difficult to see with the black thread, so try your best to either have an even space all the way around or stitch over the top of the other line.
Now the other thing the pattern doesn't tell you: but I do this, because I wear these tops and use/abuse the pockets; once you get to the top of the pocket where it attaches to the top, stitch back and forth there a few times so the threads don't loosen over time. Easiest way to do this is using the backwards or reverse button on your machine. If feeling adventurous, you can "Bar tack" them on which means using a very dense zig-zag stitch that basically stays in the same spot. If you look at most jeans, the areas with the thick thread near the zipper is bar-tacked.
Well, my dear readers, I really think that is enough for one day. You should have at this point, pockets attached to the front of your top. Next time we will make the neck and back facing, stitch the front to the back and finish off the sleeves and bottom hem. After that, we will have a top!!!
Tuesday, June 17, 2014
My apologies
We will get back to sewing momentarily, I have not been feeling well at all and have not done anything with our project. However, I do plan to write and sew more very soon!!! stay well yourselves!!!
Monday, May 26, 2014
More pattern instructions
So picking up where we left off last time, we are in the
middle of deciphering all the instructions contained inside the pattern envelop
before starting to cut any fabric.
To review, we have gone through cutting layouts, pattern
marking and sewing instruction. A few
more points to cover before moving on:
1.
We will always position the cut pieces of fabric
“right side together” unless indicated in the sewing instructions. Why??
Because once we inside out the garment all the seams will then be on the
inside and hidden from sight. You will
see these indications as a shaded and non-shaded parts of the sketch.
2.
Even if it doesn’t seem to make sense, we will
follow the directions. Why??? Because many of the pattern companies will
have us sew several small pieces together, stitch them together and turn inside
out, Voila! You have a garment. So be
patient and follow the directions, remember before the pattern goes to print,
several seamstresses/tailors have made them to make sure all instructions are
correct. If you don’t follow the step by
step instructions, the garment may not turn out as planned, may not fit, or
just in general, look like garbage and we do not make garbage!!
Any questions?? If so
please post in the comments and I will answer them as soon as I can.
Now let’s take a look at a few of the directions and to
avoid breaking copyright laws, I will be showing non-connected sketches and directions. I hope this doesn’t confuse anyone!


I like to read through the directions before beginning a project
so I sort of know what I am up against, this is not a requirement, but I like
to, so that will be a “your preference” as you grow in your skill level.
This particular pattern I have picked up is extremely
simple, there are no shoulder seams and no sleeves to worry about. I prefer the kimono or dolman sleeve scrub
tops because as a larger busted gal, the chest is a little less prominent and
it gives you more freedom of movement when working with a patient. Sometime shoulder seams, armhole openings and
sleeves can be tight and as a working nurse it becomes REALLY annoying!! So, while this top is simple it still gives
us a little practice using the terms and directions. The second top we make, I will make sure has
sleeves so we will have to attach those!
So directions briefly read, fabric ironed and pattern pieces
gently pressed to remove the wrinkles (so they are the correct size) so let’s
move on to placing the pieces on the fabric and making those all-important
cuts.
This is one instance
where you must flip the pattern piece” up” side down, or turn it over. Because the edge that should be on the fold
is at the selvedges or open ends. I
tried to photograph this though it is kinda hard to see. I’m not tall enough!!


Now these photo show the “wrong “ and “right” way to lay
this particular pattern piece, you always want to follow the arrow, so if your
arrows on the front and back pieces are going the length of the fabric, you
would want the smaller pieces oriented that way as well. This REALLY matter when using a directional
print, fabric with nap or knits with stretch.
WRONG:
WRONG:


OK, once everything is laid out and you are happy with
placement, then simply cut along the heavy solid black line in the correct
size, this one only has Large or X-Large, so we will be using the Large line.


We will begin actually garment construction next time!! Please feel free to post comments or suggestions, I will address them as soon as I can!
Subscribe to:
Posts (Atom)