Monday, May 26, 2014

More pattern instructions

So picking up where we left off last time, we are in the middle of deciphering all the instructions contained inside the pattern envelop before starting to cut any fabric.
To review, we have gone through cutting layouts, pattern marking and sewing instruction.  A few more points to cover before moving on:
1.       We will always position the cut pieces of fabric “right side together” unless indicated in the sewing instructions.  Why??  Because once we inside out the garment all the seams will then be on the inside and hidden from sight.  You will see these indications as a shaded and non-shaded parts of the sketch.
2.       Even if it doesn’t seem to make sense, we will follow the directions.  Why???  Because many of the pattern companies will have us sew several small pieces together, stitch them together and turn inside out, Voila! You have a garment.  So be patient and follow the directions, remember before the pattern goes to print, several seamstresses/tailors have made them to make sure all instructions are correct.  If you don’t follow the step by step instructions, the garment may not turn out as planned, may not fit, or just in general, look like garbage and we do not make garbage!! 
Any questions??  If so please post in the comments and I will answer them as soon as I can.
Now let’s take a look at a few of the directions and to avoid breaking copyright laws, I will be showing non-connected sketches and directions.  I hope this doesn’t confuse anyone!


I like to read through the directions before beginning a project so I sort of know what I am up against, this is not a requirement, but I like to, so that will be a “your preference” as you grow in your skill level.
This particular pattern I have picked up is extremely simple, there are no shoulder seams and no sleeves to worry about.  I prefer the kimono or dolman sleeve scrub tops because as a larger busted gal, the chest is a little less prominent and it gives you more freedom of movement when working with a patient.  Sometime shoulder seams, armhole openings and sleeves can be tight and as a working nurse it becomes REALLY annoying!!  So, while this top is simple it still gives us a little practice using the terms and directions.  The second top we make, I will make sure has sleeves so we will have to attach those!
So directions briefly read, fabric ironed and pattern pieces gently pressed to remove the wrinkles (so they are the correct size) so let’s move on to placing the pieces on the fabric and making those all-important cuts.
 This is one instance where you must flip the pattern piece” up” side down, or turn it over.  Because the edge that should be on the fold is at the selvedges or open ends.    I tried to photograph this though it is kinda hard to see.  I’m not tall enough!!


Now these photo show the “wrong “ and “right” way to lay this particular pattern piece, you always want to follow the arrow, so if your arrows on the front and back pieces are going the length of the fabric, you would want the smaller pieces oriented that way as well.  This REALLY matter when using a directional print, fabric with nap or knits with stretch.
WRONG:
 RIGHT:


OK, once everything is laid out and you are happy with placement, then simply cut along the heavy solid black line in the correct size, this one only has Large or X-Large, so we will be using the Large line.
You should end up with the following shapes:


We will begin actually garment construction next time!!  Please feel free to post comments or suggestions, I will address them as soon as I can!

Sunday, May 11, 2014

What is in those envelops?

Welcome back!!!  Today we are going to explore the contents of pattern envelops and see if we start making heads or tails out of this stuff.

I have chosen two patterns that we are going to break down and then hopefully in later installments, sew a scrub top or two!  I do need to forewarn you, I have been collecting patterns for a while as well as my fabric hoard, so many of the ones I will be using are "out of print".  The only thing that is important about out of print patterns is you cannot purchase them at your local fabric store.  If you want to purchase a pattern and follow along, please feel free to do so, I am also precariously close to breaking copyright laws but photographing the contents of the envelops.  So, with all that knowledge, let's procced:

We will begin with Simplicity pattern #8336, it is a VERY simple scrub top with 5-6 pieces, remember the fewer the pieces the easier it is.

and we will be using the happy St Paddy's day design:

I had purchased 3 yards of this fabric because I know that large scrub tops need about 2 1/2 to 2 3/4  yards.  Since I like lining things up, I always over buy so I have three yards to work with, but for this demonstration, I am not going to get overly concerned with seams and all that stuff, OK?  So let's look at the back and see what we actually need for this:


 So for a Large view "B" out of 45" cotton print we will need 2 yards of fabric, 3/8 yards of interfacing either fusible or non-fusible (remember fusible means iron on) and in the notions section looks like view "B" just needs thread.  So supplies are purchased, or in my case, laying around ready to be sewn together, lets take a look at the inside of the envelop!

There will be instructions/directions on paper similar to newspaper and the actual pieces of the pattern are printed on these tissue paper type sheets that are quite large and sometimes difficult to manipulate.  The sheets in this pattern are about 5 feet long by 5 feet wide and very difficult to photograph!


What comes next??  We need to find the correct pieces we need to make top B!  How do we do that?  First page of the instructions:


Well that doesn't seem so bad, does it?  We need to locate and cut out piece numbers; 2, 3, 5, 7, 8 and 9.  Since this pattern only contains size large and extra large, then won't be a lot of lines on the pieces we use.  Just accept that for now, we will run into a multi-size pattern soon enough!!  I had to gently unfold all three sheets to find the correct pieces, but once located and cut out, I am able to refold the remain sheets to fit back into the envelop for later, kind of map folding; takes a little practice, but with a little patience, completely doable!

Now we have our pieces ready to go onto the fabric.  Let's take a moment to really go through the pattern directions, so we can better understand some of the terms used later on.
First page:
Will give you sketches of the items included in the pattern envelop, the corresponding piece numbers, and if you look up near the Simplicity logo you will see 1 / 4 which means this pattern has 4 sheets of directions.

Just beneath the sketches starts the "General Directions" section.  This is an important area, so don't skip it!  This pattern is printed in both English and Spanish, I only took photos of the English portions, as I don't speak Spanish, so I can only guess what that side is saying.  I know the above is a little blurry, but worry not!  I took more photos...  Starting at the top left, "the Pattern"

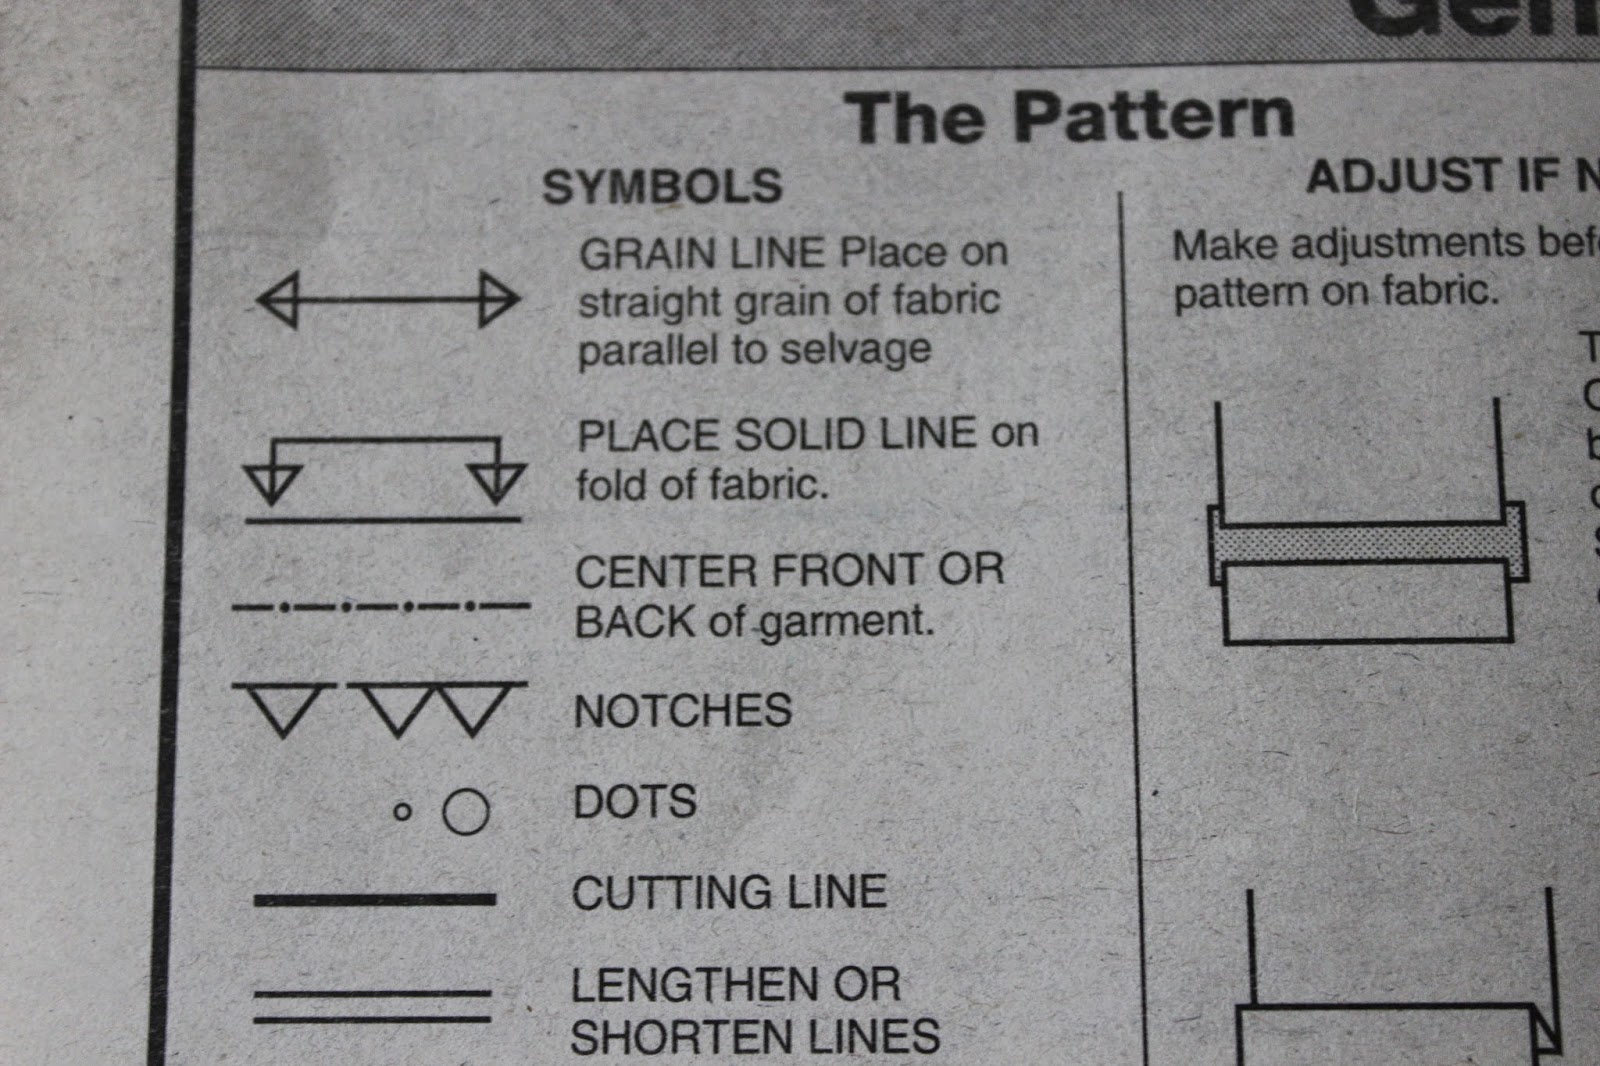
The Symbols that are printed on the tissue paper pattern are explained in this section.  These are VERY important!!  When you cut the pattern be mindful of the little arrows on the solid lines, remember the "color in the lines" lessons?  Well, similarly cut on the bold solid line.  Let's go in order:
  1. The line with the arrows at both ends means "grain line" this is exceedingly important when working with nap fabrics, directional prints, knits and all fabrics to a lesser extent.  
  2. The arrows pointing towards a solid thick line means you are going to place that piece of the pattern on the folded fabric.
  3. Dashes and dots means this is the part of the fabric that will be centered on the wearer's front or back, respectively.  Imagine an invisible line running from the nose down, this is where the dashed line will be on the garment we are creating.  Hope that makes sense.  The back is easier to imagine, the dashed line should be on the spine.
  4. Notches I really really really really wish that these were printed on the OUTSIDE of the solid line....  The notches are stupid important because this is how one will line up things like sleeves, the front of something to the back of something, and if you cut them into the lines, while it make work, you may also have just made something a wee bit to small.  I cut mine outward, so I ask you do the same, k? K!
  5. Dots are also a means of lining up things while we construct the garment  They are handy to ensure you have the pieces aligned so you don't end up with a stitch ripper redoing all your hard work.
  6. Cutting line seems obvious enough, you cut on this line.
  7. lengthen or shorten lines, if one is of a taller stature or petite, these lines will be your friends.  See below for more on adjusting length.
Expanding on #7 above, the other box are the directions to make the garment a little longer or shorted, for those taller or more petite than average:

 Which is very self-explanatory so we will move on...
 Sewing directions:
This is where it may get a little more confusing,

  1. Pin, is obvious, but "machine baste" means that using the longest stitch your machine has to "tack" the pieces together until a more permanent seam can be placed.  
  2. Stitch 5/8 seams unless otherwise stated.  So this might be a good time to bring up a term called "seam allowance".  When sewing 2 pieces of fabric together, how far from the stitch line to the edge of the raw fabric is the seam allowance.  This particular top has a 5/8 seam allowance.
  3. Press seams open unless otherwise indicated.... Once the stitch is placed, take your iron and flatten the edges 
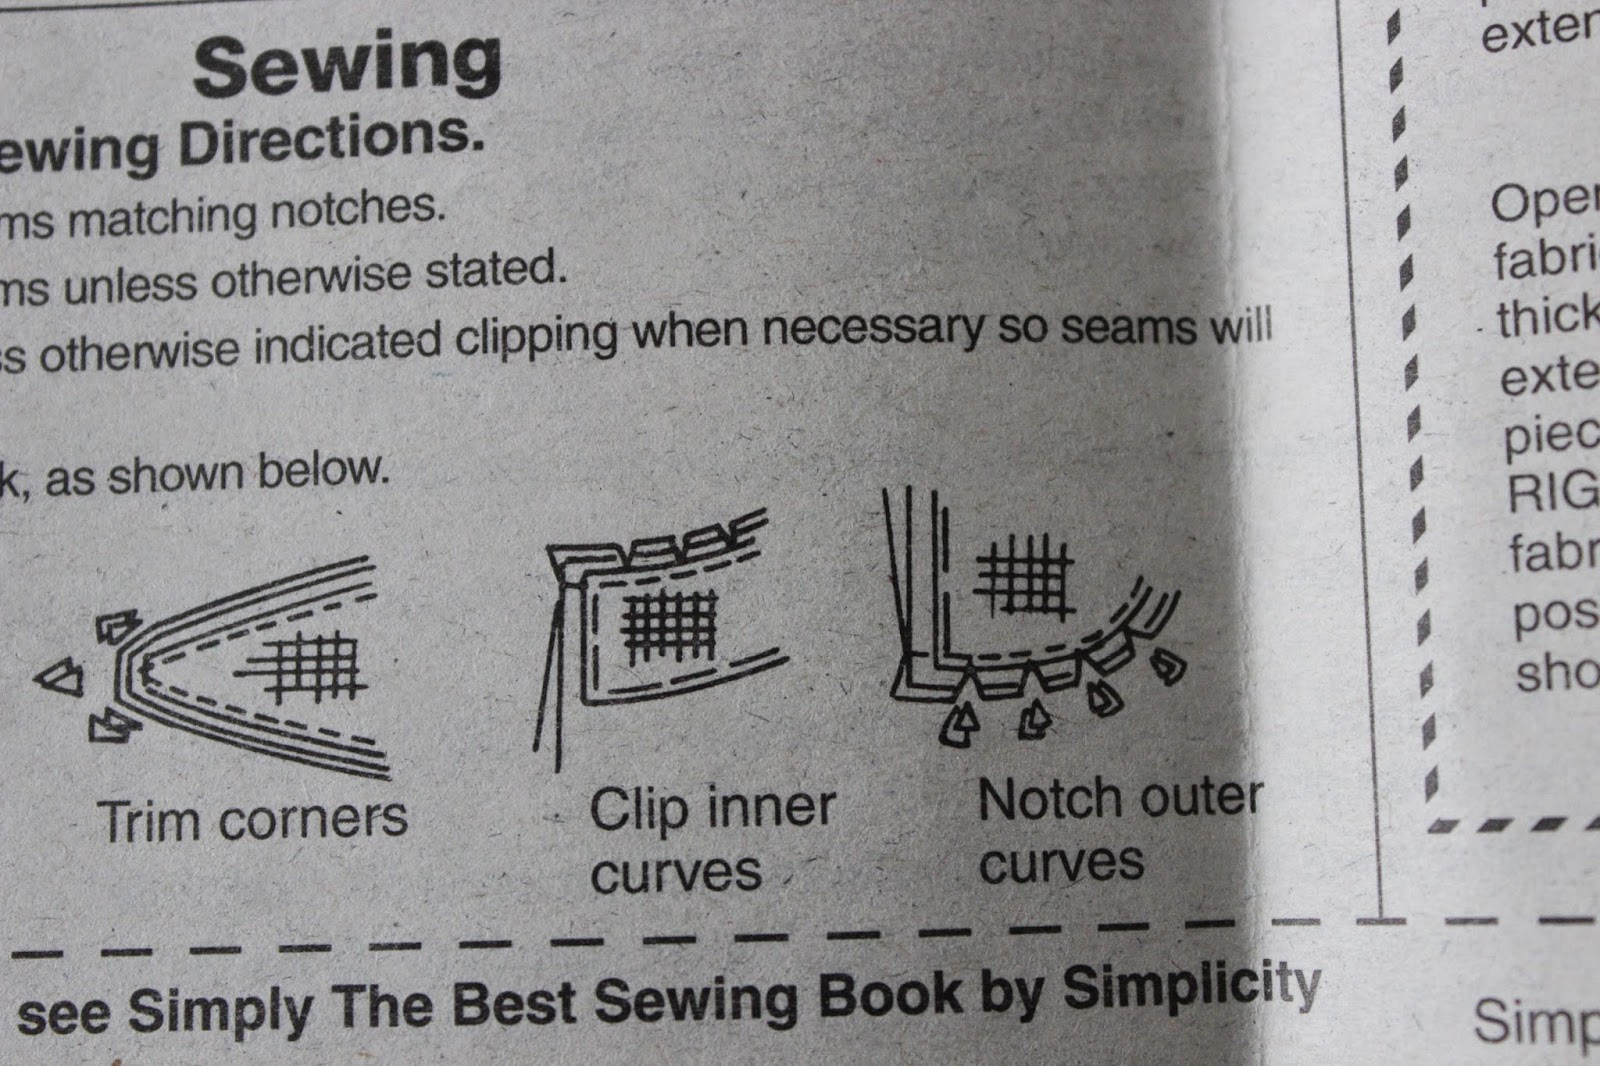
  4. Trim seams to reduce bulk as shown below; we will go through the pictures individually.  When creating an item, sometimes the seams will get bulky and cause puckering in the corners and other things that won't allow the garment to be finished nicely.
    1. Trim enclosed seams into layers, this one is a tricky one to master.  It is a folding technique as well.  
    2. Trim corners.  This is especially important when making a collared shirt, let's say.  The collar should come to a tight point, but if there are too many layers on the inside, it will be bulky and buldgey (is that a word) and no amount of ironing will make it lay flat.
    3. Clip inner curves.  This is also important for the finish of the garment, if a garment has "princess seams" or something similar in detail, clipping curves will help the seam lay flat and the seam look straight and finished.
    4. Notch outer curves (below). Similar to the inner curves, the outer curves if not clipped will not allow the fabric to curve correctly.  For example, a fleece hat will need to curve at the crown (top of head) and in order to do that, you have to clip the outer curve.
Alrighty, so, onto page 2.  These are the "cutting layouts" which simply means where to put the pieces on the fabric so you will get the best results.  You don't HAVE to follow the suggested layout, but sometimes it is nice to have a suggestion.  Personally I am notorious for not following a layout, I like to call it "creative pattern laying", but until you are comfortable with the whole process, let's just stick with the manufacturer directions.

Ok so you may notice that the large arrows are marked in the cutting layouts, remember the first page, the large arrows mean "with the grain" of the fabric.  Or if it helps, keep all the arrows going the same way.  you will also see some shaded pieces on the layouts, this is to indicate to turn the pattern piece over in order to achieve the correct placement.
There are also the words "fold" and "selvage".  The selvage edge are the manufacturer edges on the width of the fabric and the fold is of course the fold in the middle.  The selvage edge is finished by the manufacturer and will not fray or pull apart.  Below are photos of the selvage edges of the St Paddy's Day pattern that we will using for this example:


With this particular manufacturer, they have the print all the way to one edge and their information on the other.  This fabric is not intended for "children's sleepwear" probably due to a flammability rating and I want to point out those little circles with numbers in them.  These little indicators are AWESOME for quilters because you can trim off those little circles and take them with you to the fabric store, and simply match them with other prints so the colors will go. 

So I think this post is certainly long enough, while there is plenty more to talk about, let's just take a moment or two to review the information in this post before I throw WAY too much at you at once!!  Please ask any questions you may have, and I'll see you next time!

Saturday, May 3, 2014

With nap or without nap, that is the question...

OK, so I was thinking that we may need to pause for a moment and discuss fabric patterns and textures before moving forward with garment construction or further pattern dissection.  As you may (or may not) have noticed, some of the pattern envelop backs in the previous post have stated: "extra fabric may be needed to match plaids" or "not suitable for stripes", or the very last Butterick pattern has little stars that indicate "with or without nap".  I can hear you now, "What the heck is nap??"  Besides the obvious thing of taking out favorite blanket and pet and curling up after a long day of staring blankly at the pattern in front of us!!  LOL

Nap for a simple explanation is the way the fabric lays to catch the light in a uniform way.  Or perhaps the definition will help:
Nap:In actual fact, the raised, hairy or downy surface on fabrics such as flannel, etc.  In pattern however, "with nap" means any fabric surface that looks different when held up or down, such as pile, knits, and one-way designs.
Clear as mud?  So let's explore what that actually means and how this will impact the construction of the garment.

The easiest and most common example of nap is carpet.  Hopefully we have all vacuumed a carpet and parts suddenly look lighter or darker with the vacuum passes:
so the carpet is all the same color and it shouldn't matter which way we push the vacuum, but it does; same with fabrics.  If you don't pay attention to the nap, one sleeve may appear darker/lighter than the other and your garment looks "odd".  Unless of course that was the goal and some designers have flipped the nap for the sleeves or whatnot, but we won't go there yet either....

Same thing with directional prints, some plaids and some stripes, some won't matter because they are either random enough or repeat enough to not really matter, others are slightly more complicated.  Patterned fabric with an obvious directional print are a LOT easier to line up; like the ducky fleece pictured, there is a right way and a ... not so right way:


 Ah, now you may argue, yeah duh, of COURSE I don't want upside-down ducks on my stuff, but what is the big deal with stripes, plaids and directional patterned fabric?  It simply looks better.  A few extra moments to line up the seams makes the garment look like the piece is a well thought out, well constructed garment.  This purchased Hello Kitty scrub top is a good example.  I understand the manufacturer wants to get as many tops out of the fabric bolt as possible, but I wish they had lined up the back a bit better:


Again, does not affect the fit of the garment, but it would have looked better!!  So, what else can we line up with a foresight?  Glad you asked!  Here is dress shirt I made for my husband:

I tried to line up the dragons so they were almost in the same place on both sides.  Does it make the garment fit better?  Nah, just looks cool!


OK so that seems obvious.  Another example of some forethought, here is a Halloween scrub top I made a few years ago.  Cute print and I wanted the pockets to "blend in";

See the pockets?  if you look closely, you can see the orange thread in the black cats;but, I will make it easier for you,

I usually “over buy” the yardage for the simple reason, I like to line up stuff to the best of my ability.  If the pattern calls for 5/8 of a yard, I’m buying a full yard because 1. The bottom edge is rarely straight and 2. I like having that little extra knowing that I can move the pattern pieces around a little.  Gives a little “breathing room” so to speak.  That is not to say you have to do things this way, but it’s the way I work.
 
***Side note***  the unfortunate thing about my favorite pattern company KwikSew is they tend to waste A LOT of fabric.  So take that with a grain of salt.  KwikSew likes to line up all pattern pieces on the manufacturer’s fold, but once you get used to it, you can do a little “creative pattern laying” and save as much as a yard, depending.  A yard of fabric may not seem like a lot, but some fabric are QUITE expensive per yard, I’ve seen fancy bridal fabrics run $25 or more a yard and bridal lace is terribly expensive, running $30 to 40 a yard and they aren’t very wide.
 
So if you ever see pretty lace on sale, BUY IT!!!!  My husband, the enabler, says “what will you use it for” and I respond “I don’t know yet, but it is a fabulous buy” then he will say, “Buy it all so you have it when you need it”.  This is why I have the Fabric Hoard!!!
 

Friday, April 18, 2014

Pattern envelop deconstruction


Welcome back sewers!!! 

Glad to see you all ready to dissect a pattern envelop back.  If you have one, please pull it out and if you don’t, no worries, photos will be provided as we walk step by step through all the information on the back.

Pattern envelop backs are a little different as each company has their own “style” but each one holds the same information.  Most of the patterns I will reference belong to the McCalls/Butterick/Vogue/Kwik Sew company, not that they pay me (ahem, that would be nice) but the Simplicity brand confuses me slightly because I grew up using McCalls and Butterick patterns.  Simplicity patterns tend to have you make several different pieces of the item sew them all together and then you are done, but it does not lend itself to seeing the item take shape as you sew which helps me a lot, I know people who swear by Simplicity and find the McCalls “technical” and “difficult”, so it is a preference thing.  Many of the items you can sew with the patterns are similar by both companies so go with one you find easiest to understand.  Also as a side note, I do not own a dress form.  Always wanted one…

Anyway, back to the task at hand; pattern envelop backs.  So you may have had the opportunity to flip through those big books at the fabric store and look at the articles of clothes that one can make with the corresponding pattern.  If you haven’t had the opportunity, please go, it is a fun thing to do and it gives us ideas and inspiration!!!  If you want to run out now, I’ll wait….

OK, so patterns in hand and now what?!?!?  Well let’s start with the front, it is WAY simpler than the back, the front shows a couple different things you can produce from the enclosed pattern, also gives you the size range of the enclosed pattern.  Most patterns these days are very true to size so pick the size you usually wear.  Some used to be notoriously small, but I think those days are past.

On to the back  you will see several different sections; I will identify each and have the most common companies pictured.  Once you are familiar with these sections, you will able to pick up a pattern produced anywhere and understand what is needed. You may also see more than one language as well as the instructions on the inside which we will get into later.

Let’s start with McCalls:

The VERY top left corner is the pattern number, while looking through the big pattern books, this is the corresponding number to item pictured.  This pattern happens to be a little girl’s dress pattern.  The number of items mean how many individual pattern pieces are in this envelop.  Patterns are printed on massive sheets of thin tissue paper-type paper and are quite fragile.  When unfolding the pattern, be gentle!

The highlighted box gives a brief description of what can be produced from the pieces in this pattern.  It appears this girl’s dress can be made with a staggered hem line (think train of a wedding dress), that is dress A or an even hemline, dress B.    Dress A also has long sleeves while dress B is short sleeved, there may be instruction if you want Dress B to have long sleeves, but this isn’t the time for that … yet.  Towards the very bottom are sketches of the front and back of a finished garment, these can also appear down the side of the pattern envelop as you will see with some of the other companies.

The next box down highlighted below is where we find out if we need a woven fabric or a knit.  Once you are more used to this whole process, you will be able to look at the photo and kinda get a feel for woven or knit.  Not being able to see the front of this envelop, I know this will call for woven fabric because it is a “formal” dress (Christening or costume) and generally those will be woven.  So let’s look at the “SUGGESTED FABRICS”:
As you can see, this pattern calls for Satin, Jacquard, Shantung, silk organza, and chiffon for the different view.  Confused?  Let’s look into this a little deeper, because this box is VERY important.  Pretend that you want to make dress A, so you would disregard everything that mention for “B”.  So for Dress A you will need Duchess Satin, Jacquard and a pleated chiffon, plus a no-cling lining.  How much of each is explained in the following box and that may also get confusing so let’s look a little deeper into it:

Now fabric GENERALLY comes in 2 different widths, 45” and 60”.  Both are folded in half at the manufacturer and are put on “bolts” those cardboard pieces that the fabric is wrapped around.  Cotton generally is 45” and polyester is 60”, with the exception of upholstery fabric which ranges 54 to 60” wide (or more sometime) and that fabric is hung on rolls or tubes.  While you COULD use some upholstery fabric with this pattern, let’s stick to what the pattern actually calls for!  So, across the top, you see sizes which means the finished product, for this example let’s say our girl is a size 6 and remember we are making dress A.  So the main fabric we need is Duchess satin which is similar in texture to Satin peau, both 60” wide and we need 3 and 3/8 yards of the 60” wide satin.  Notice the pattern calls for 54” wide fabric, this does not matter much because it is better to buy the wider fabric, gives you a little more “room” while laying out the pattern pieces than a 45” piece of fabric.  Dress A also has 3 contrasting items, whether a different color or texture they are as follows; contrast #1 ¾ yard of 60” jacquard, contrast #2 1 ¾ yards of 45” wide pleated chiffon and contrast #3 5/8 yard of 54” or 60” duchess satin.  Where did I find the pleated chiffon and satin?  In the suggested fabrics section of the pattern, just above the size box.

Next on this particular pattern company comes the “Notions” sections, please do not overlook this!!!  I understand it is on the bottom, but it is equally important as the fabric suggestions and the amount of fabric you need because this section will tell you what else you may need to finish off the garment like what length zipper and such.  Let’s look closer at the notions box:
Almost all notions suggestions will begin with “thread”; while this is a no-brainer to most, they are probably obligated to put that here, because once upon a time some use black thread on the white dress because thread was not in the notions….  OK, so past the thread, we will need a 14” zipper either invisible or regular, looks like the finishing lace is optional, a hook and eye and assorted beads and pearls are also needed.  Now notice that after the assorted beads and pearls, it breaks down again to Dress A and Dress B.  For this example we are still making dress A, so we would purchase the desired lengths of everything listed prior to the Dress B.

The last box is the finished dimensions, that is pretty straightforward, so no reason to delve into that section.

**Side note, while this pattern is GREAT as an example, I would NOT recommend this for beginners.  Rule of thumb; the number of pieces is a good indicator of how complicated a pattern will be.  This particular pattern is 24 pieces and while I’m undaunted by this, I would recommend a beginner to stick with 10 pieces or less until “horsehair braid” is a regular item at the bottom of the sewing box….

Let’s look at another brand so you can see the difference, here is a Simplicity pattern envelop back:

Hopefully you can see an immediate difference in the set up of the information; however, also notice the similarities in the information.  This pattern is for a ladies’ top, with a couple different combination of long sleeves, short sleeves, no sleeves and a gathered waist.  Once again, begin at the top left, pattern ID number and under that, number of pieces, this pattern has 10 pieces enclosed.

This Pattern company goes right into suggest fabric and does not give a description of the finished items:
This is also a woven pattern because the suggested fabric starts off with a cotton, the next couple fabric choices are all a polyester blend of woven in varying degrees of weight, but this looks like the softer and more drapey the fabric is the better!  So touch the fabrics and if it is very stiff, walk away!

Next box on this envelop is the notions, remember the other company had this box at the bottom?  Well, Simplicity has this box towards the top:
Of course Thread is first again!  LOL!  Then all the options in this pattern need one pkg of single fold bias tape, then option A, C and D need 1/4” elastic and option D needs buttons in addition to the rest.

Let’s take one second to look at all the sketches down the side of the package BEFORE we look at the fabric requirements, because this is where some novices get into trouble.  Please notice that option A and Option C are listed with the same drawing with the exception that option C is sleeveless.  Both A and C are very similar in construction, but A is the only option with full or probably ¾ sleeves, but I don’t have the front of the package to see the finished garment.  Similarly B and D are short sleeved with a slightly different necklines, D looks like it may have a collar and it looks like the sleeve hem on B is flat while D looks like it is puffed a little.  E and F are again very similar with E having a collar similar to option D’s collar.  Got it??  Great!!!  Let’s move on….

Next come the fabric requirements, or how much fabric you need to make the item:
OK so the pattern sizes are a little further down on this back, past your measurements in case you are unsure of what size to buy.  Generally you want to sew the size you wear most often.  Let’s pretend again we are making a size 12 top using option B.  We will need 1 and 5/8 yards of 45” wide fabric or 1 and 1/8 yards of 60” wide fabric.  Simple enough, don’t forget those notions!  And we are done with this shopping trip. 

The finished measurement of the garment appear toward the top of the envelop back unlike the McCalls where they appeared at the bottom.

Getting easier to understand?  I hope so, it isn’t as hard as most people think it is, let’s run through a couple other patterns just for the fun of it!

Here we have a KWIK SEW pattern.  They used to be a stand-alone company but at some point they magically became part of the McCalls/Butterick/Vogue conglomerate.  Let’s take a look:

Now across the very top you see the familiar pattern ID number and what this company calls this pattern, a misses Jelly Roll Jacket.  Notice the number of pieces is not printed on this envelop.  Next box down is a brief description of the item.  Then KWIK SEW varies a bit from the others and states right there between suggested fabric and the item description that this pattern is designed for woven fabrics.  Remember when I told you that KIWK SEW seems to be the only pattern company that tells you straight off the bat whether the pattern is for knit or woven fabric?  Well, there it is!  Now, on to suggested fabric:

This pattern calls for cotton, batiks, linen, lightweight denim and rayon blends.  Again probably not a jacket I would recommend for beginners because of the jelly roll detail on the front of the jacket, but is was a good example.

This pattern company prints the measurements next, those are self explanatory along with the finished measurements.  Remember, McCalls has the finished measurements at the very bottom and Simplicity has the measurement at the top and finished garments measurements at the bottom.  Same information, different locations.  Let’s move on… to amount of fabric needed or sizing:
We are going to use jacket A for this example because the B option has the pleating or Jelly roll and that is a bit much for our purposes.  So, let’s make a size Large jacket A.  How much fabric will we need?  If we 58-60” wide fabric, we need 2 and 5/8 yards for the white parts and contrast which is the light gray color in the sketches we need 7/8 of a yard.  If we are using fabric that is 45” wide we need 3 and 5/8 yards of the main fabric and 1 yard of contrast.  Make more sense?

**Side note**  some of the patterns have mention “fusible interfacing”.  This is narrow webbing that is ironed onto the unprinted or “wrong” side of the fabric to provide softer fabric a little more stiffness when making  cuffs or collars.  There are a myriad of interfacings, different weights, colors and sew in and iron on.  The iron on kind is called fusible while the sew in kind is called non-fusible.  This pattern needs ¾ of a yard of iron on (fusible) probably for the collar.

Now let’s not forget notions, KWIK SEW has their notion requirement at the bottom and of course thread is #1 again!!
All this one seems to need for jacket A are 5 buttons.

Seeing the similarity?  I was going to say, do you see a pattern but thought the better of that!! LOL.  Now one last pattern company which is Butterick and I was very pleased to find a knit pattern to show you:
This is also a Misses tops pattern with quite a few choices, but I want to call attention to the blue arrows along the right hand side of the envelop back.  This is required stretch of the knit needed to make this pattern correctly.  Unfortunately this isn’t the best quality image, so I have a woven pattern to dissect:

 Biggest difference in the Butterick patterns?  Anyone spot it??  The pattern ID number is NOT printed near the item description.  It is barely noticeable it the top right hand corner of this pattern and if you look at the above knit pattern  it is in the extreme left corner.  Otherwise it is looking familiar!!

Top box is the description, notions and fabric suggestions all in one.  The information begins with brief item description of Misses dress and stole, a more formal wear type item which requires?  WOVEN!!  Right!

Next are notions required, interestingly enough this does not have thread first or mentioned at all, maybe they believe we are smart enough… who knows?!  Both dresses require the same notions of a zipper, decorative buttons, seam binding and hook and eyes.  Fabric suggestion is next within that same paragraph:
This one specifically mentions the incompatibility of a striped fabric with this pattern, some will mention if the pattern company has not had good results with certain patterns.  All these companies have people with varying skills make these patterns prior to printing in production to ensure we will be able to make the item as pictured.

Next is the fabric requirement:
 Ok so we all know by now that if we want to make a size 12;  dress A which appears in the sketch to be more knee length and dress B will be full length, we will obviously need more fabric to reach the ground than the knee.  Hope this is beginning to make sense…  Size 12 Dress B will need 3 and ¼ yard of 45” wide fabric and 1 and ¾ of 60” wide fabric.  The stole (or wrap) require 2 and 5/8 of either width.  There is interfacing mentioned but does not specify on envelop whether fusible or not.

I hope we are all a little more familiar with the back of the pattern envelops now and I hope this post made it a little less scary to delve into those books at the fabric store.

Later we will go through the instructions included with patterns because those are also critical in success!!